Pages

I've migrated my blog

Thanks for visiting my blog. I am no longer maintaining this and I've migrated the blog to my personal domain . If you would like to follow my blog kindly use my new RSS feed

Wednesday, August 17, 2011

Test Driving Model Validation in ASP.NET MVC3 - Part 2

In Part-1 of this small blog post series, we have explored a way to do the TDD of controller’s responsibility in the context of model validation. In this Part-2 we are going to see “How to do the TDD of Model Validation”
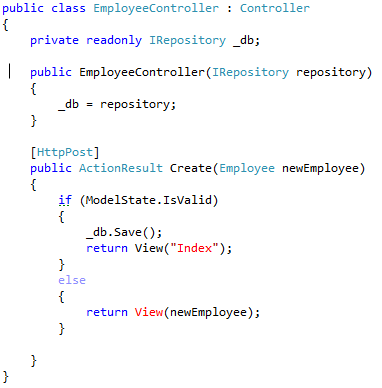
Before getting into the business let us have a quick look at how ASP.NET MVC3 does the model validation. Internally when making an Http POST/GET request, MVC3 makes use of a helper class Validator located in the namespace System.ComponentModel.DataAnnotations. Validator can be used to validate the models based on the ValidationAttribute attributes associate with the model. After validating MVC3 adds the validation results to the controller’s ModelState Property by the AddModelError method which in turn sets the ModelState.IsValid property (Refer Part-1). We are actually going to make use of this Validator helper class going to test drive the model validation.   
Let us start with a small requirement
“Employee name should not be empty”
The corresponding unit test will be like as follows
ValidateObject Method determines whether the specified object is valid using the validation context and throws a ValidationException if the object is invalid.
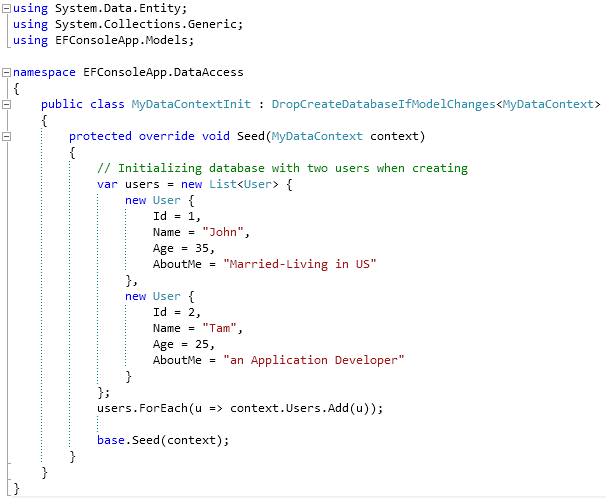
Employee Model will be like as follows
When you run the test “EmployeeNameShouldNotBeEmpty”, it will Fail with the error message “System.ComponentModel.DataAnnotations.ValidationException was expected”. Now it’s time to make it Pass. Thanks to RequiredAttribute, we can make the test the pass without much effort. Just decorate the Name property with the [Required] Attribute. That’s it. Now run the test and it will Pass. As there is no scope for Refactoring, we will be ignoring it.

Well, we have done the TDD of model validation. Now let’s move onto the next requirement.  
“Employee age should be greater than 30”
Let’s write the unit test for this requirement.   
When we run the test, we’d get a failing test with error message “System.ComponentModel.DataAnnotations.ValidationException was expected”
Like RequiredAttribute we don’t have any AgeLimit Attribute to make the test pass. However we can create such kind of CustomAttributes. Another approach would be making use of IValiadatableObject. I will be using the latter option in this blog post, if you are interested in creating custom attribute refer this blog.
Here we go; the modified Employee model will look like as follows
The Validator helper class will invoke the Validate method of the model if the model passed to the ValidateObject Method implements the IValidatableObject.
Hurrah! Now you will be getting a passing test. We have done the TDD of Model Validation.   
Summary
In the blog posts Part-1 and Part-2 we have seen how to test drive the model validation in ASP.NET MVC3. The bottom-line is we should not combine the unit tests of model validation with the controller’s unit tests and both should be kept separate. You can download the source code which we’ve seen in this blog post series from here.   

Saturday, August 13, 2011

Test Driving Model Validation in ASP.NET MVC3 - Part 1

Entity Framework 4.1(EF4.1) provides in-built support for defining the validation constraints in model through Data Annotation attributes and Fluent API. It’s one of the cool features provided by EF4.1 that enables the developers to define validation rules of the model in an easy and more maintainable way. In addition to that MVC3 framework makes use of these validation model and supports both client and server side validation without writing any code!

I’m in the early days of practising Test Driven Development (TDD). Fortunately I have got an opportunity to implement TDD in my current assignment. I feel I am much oriented and focused towards the solution while using TDD. Also it makes me to critique my design and the way I do the coding. I would like to be a better programmer and looking forward to improve myself and hence TDD suits me more. Learning TDD and practising TDD is totally different! Yes, in theory it is very easy to read and understand TDD. But when you practise it, you will encounter many more interesting things about TDD and in fact it’s where you can actually learn TDD.

Okay, how to do TDD with Controller's responsibility in the context of Model validation in MVC3. Well, it is easy but we should understand and find out what exactly we want to test and the way to test them. Many articles and blog posts suggest doing it through the controller. Is it really a good approach to test the model validation through controller?   Kindly think of it for a moment. I feel it is not a right way to deal this stuff. 

Let me explain it through a small example. Consider an Employee model which has two properties Name and Age and an EmployeeController responsible for doing CRUD on Employee Model. What is the responsibility of EmployeeController when creating a new Employee data? It should check whether the posted employee model is valid or not, if it is valid add to the database else return the view with the validation errors. MVC3 framework makes life easy by automatically validating the Posted model and set the IsValid Property of the ModelState and also add validation errors to the model. Hence controller's job is very easy as follows


Corresponding TestCases:
  • When creating a new employee, if the passed employee data is valid, it should be added to the database
  • When creating a new employee, if the passsed employee data is InValid, it should not add to the database and show the view with validation errors.

The first unit test will be as following:

This unit test makes use of the following fake Database implementation.

To keep this blog post simple, I am not showcasing the TDD steps which I have done here and the EmployeeController Code would be as follows.


Employee Controller makes use of an InMemory Database (Simplest option!!)  which implements the IRepository interface. 


I have done all the wire ups to make the first unit test pass. (Pardon me! For the sake of simplicity of this blog post I've violated TDD rules. Hope you can infer the TDD steps from the coding samples). Its time to  move to the next unit test and here comes a bottleneck.    

You may wonder what it is that. There comes a feature of ASP.NET MVC 3 framework. During HTTP post action the framework validates the employee model and sets the EmployeeController's Property ModelState.IsValid to true or false. It occurs only during HTTP post. In our unit test code we are actually calling the action methods of the controller and not making any HTTP post. So, the ModalState is always true whenever we call the action methods of a controller from a unit testing code. 

In our second test case, we need to setup a controller in such a way that its ModelState property is InValid. We can do this by adding a ModelError to the ModelState property of the EmployeeController. Infact it is what MVC3 framework is doing under the hood when making HTTP post. 


Hurrah! Thats it !!

Now we Test drived the controller's responsibility in the context of model validation. In my next blog post  I'd showcase how to the test drive the model validation itself.


Thursday, August 4, 2011

EF Code First 4.1 in Console Application

Whenever I learn any new things in .Net or experimenting with something, I always prefer to use Console Applications. I personally feel it helps me to concentrate more on what actually I am trying to learn or experiment without any sort of distractions. Moreover it keeps things simple.
            I would like to do the same while learning EF Code First 4.1. Though most of articles in web explain EF with respect to ASP.NET MVC, I favor learning it through my own way using console application without creating any controllers and views!!
Following are the prerequisites to work with EF Code First 4.1.
·         Visual Studio 2010 SP1
·         Entity Framework 4.1
·         SQL CE or SQL Express (SQL CE would be an ideal option for learning purpose)
Let’s go and create the console application.
After creating a console application project, the initial step would be adding references to the following assemblies.
·         EntityFramework (Version 4.1)
·         System.Data.Entity
·      System.ComponentModel.DataAnnotations

Now it’s time to defining the model and the data context. To keep it simple, I am going to define only one model “User”.

 The data context would be as following.


This basic infrastructure is sufficient to run the console application. However as we are using the data context for learning purpose, we might change the model often and doing so will make it inconsistent with the database created automatically when you run the application for the first time. We can circumvent this situation by creating new Data Context initialize class that inherits from DropCreateDatabaseIfModelChanges<TContext> where TContext is the data context that you want to sync with the database always. This class also offers an override function “Seed” using which we can fill the database with some initial data.
The finished code of DataContext initialize class will be like the following.

This datacontext initialize class would create the database whenever the database model changes and create two users by default. Now it’s time to code our Main method, which is actually to trigger all the actions!.
Here we go. Pay close attention to the first statement in the Main method that initializes the database with an instance of DataContextInit class that we have created.
           
Now you can run the application without any configurations. The default behavior of EF Code First will create the database with the same name as your data context name here “MyDataContext” in the SQL Express server installed in the local machine. If you wish to change this default behavior and wanted to use SQL CE instead of SQL Express just add an App.Config to the project and create a connection string with the name of your data context as follows.

That’s it. “Ctrl+F5” and here is the output

Summary
            In this blog post we have explore the basic foundation on how to work with EF CodeFirst using console application. If you want to get your dirty with EF Code First without any distraction Console Application is a better one. You can download the sample code used in this blog post from here.

Wednesday, August 3, 2011

Using Ajax.BeginForm – ASP.NET MVC3 Ajax – Part III

In my previous blog posts Part 1, Part 2 we have explored how to use the Ajax.ActionLink() helper method to implement a basic Ajax request. In this blog post we have are going to see an another useful helper method “Ajax.BeginForm()”.
                We will be implementing the following scenario using the Ajax.BeginForm(). The scenario would be having a view consisting of a simple form with name and email field.


Upon clicking the “Submit” button, the data will be sent back to the server via Ajax Post request and get a confirmation like this.


                ASP.NET MVC3 offers an intutive way to submitting/posting the form data to server via ajax using Ajax.BeginForm Helper method.
                Lets start developing the scenario by first defining the Model (Not using TDD to keep this blog post simple).
using System.ComponentModel.DataAnnotations;

namespace UsingAjaxForms.Models
{
    public class PersonalDetail
    {
        [Required]
        public string Name { get; set; }

        [Required]        
        public string Email { get; set; }
    }
}
                To keep things simple, Our PersonalDetailsController will be having only two action methods. One will handling the “Get” request for Creating PersonalDetail and the other one for handling “Post” request for Creating PersonalDetail.
using System.Web.Mvc;
using UsingAjaxForms.Models;

namespace UsingAjaxForms.Controllers
{
    public class PersonalDetailController : Controller
    {
        public ActionResult Create()
        {
            var personalDetail = new PersonalDetail();
            return View(personalDetail);
        }

        [HttpPost]
        public string Create(PersonalDetail personalDetails)
        {
            return "Hi " + personalDetails.Name + "!. Thanks for providing the details.";
        }
    }
}
                Now, the stage is set to play using ajax. The View for Creating new PersonalDetail using Ajax is similar to that of using oridinary post back except one factor. We need to replace the Html.BeginForm helper method with the Ajax.BeginForm.
                Ajax.BeginForm method has 11 overloads. On this blog post we are going to use the following overload.
Ajax.BeginForm(string actionName, string controllerName, AjaxOptions ajaxOptions)
The actionName and controllerName points to the handler which is going to handle the ajax request and the ajaxOptions defines the behaviour of the ajax request.
The View for Creating PersonalDetail will look like this
            
                That’s it!! All you need to do is to enclose your form into an Ajax.BeginForm method wired with the necessary configurations.  You can also play with the Ajax request by adding a loading animation as I have mentioned in Part II blog post.

Note: Dont forget to add references  to the jQuery script files.
Summary:
                In this blog post we have seen a very basic way to create Ajax forms in ASP.NET MVC3. In my upcoming blog posts we would explore some advance usage of Ajax forms. You can download the source code of this blog post from here.